Xilinx Zynq-7000 (dual core ARM Cortex-A9) SoC Port
Demonstrated on a ZC702 evaluation kit
[RTOS Ports]
This page documents a FreeRTOS demo application for the Xilinx Zynq-7000 SoC,
which incorporates a dual core ARM Cortex-A9 processor.
The demo is pre-configured to build with the
Xilinx SDK tools
(version 2016.1 at the time of writing) and execute on the
ZC702
evaluation board.
The project uses the default hardware design and board support package (BSP) shipped
with the SDK, and builds FreeRTOS and lwIP as part of the application (rather than part
of the BSP).
IMPORTANT! Notes on using the FreeRTOS ARM Cortex-A9 port on the Xilinx Zynq-7000 SoC
Please read all the following points before using this RTOS port.
- Source Code Organisation
- The Demo Application Functionality
- Build Instructions
- RTOS Configuration and Usage Details
Also see the FAQ My application does not run, what could be wrong?, and
the page that provides instruction on using FreeRTOS on ARM Cortex-A embedded processors.
Source Code Organization
The FreeRTOS download contains the source code for all the FreeRTOS ports, and
every demo application. That means it contains many more files than are required
to use the Zynq port, or the official Zynq demo application.
See the Source Code Organization
section of this web site for a description of the downloaded files, and
information on creating a new project.
The directory structure used by the demo application is shown and described
below. The root CORTEX_A9_Zynq_ZC702 directory is itself
located in FreeRTOS/Demo.
CORTEX_A9_Zynq_ZC702
    |
    +-RTOSDemo           Contains the SDK project and C files specific to the demo.
    |
    +-RTOSDemo_bsp       Contains the hardware BSP.
    |
    +-ZC702_hw_platform  The hardware description.
Notes relating to the directory structure:
-
The projects contained in the ZC702_hw_platform and RTOSDemo_bsp directories
are the defaults generated by the SDK when the ZC702 is selected as the
target hardware for a new project.
-
The RTOSDemo directory only contains the source files that are specific
to the Zynq demo. The FreeRTOS source files, and the source files that
implement tasks that are common to all demo applications, are located
elsewhere in the directory tree.
Therefore the project will only build when the default directory structure
is unchanged. Also see the page that describes
how to use virtual and linked paths in
the Eclipse project explorer.
The Zynq-7000 SoC Demo Application
Functionality
The constant mainSELECTED_APPLICATION, which is #defined at the top
of main.c, is used to switch between a simply Blinky style demo, a more
comprehensive test and demo application, and an lwIP demo, as described in the
next two sections.
Functionality with mainSELECTED_APPLICATION set to 0
If mainSELECTED_APPLICATION is set to 0 then main() will call
main_blinky(), which is implemented in main_blinky.c.
main_blinky() creates a very simple demo that includes two tasks and one queue.
One task repeatedly sends the value 100 to the other task through the queue.
The receiving task toggles an LED each time it receives the message. The message
is sent every 200 milliseconds, so the LED toggles every 200 milliseconds.
Functionality with mainSELECTED_APPLICATION set to 1
If mainSELECTED_APPLICATION is set to 1 then main() will call main_full(),
which is implemented in main_full.c.
 main_full() creates a comprehensive test and demo application
that demonstrates:
main_full() creates a comprehensive test and demo application
that demonstrates:
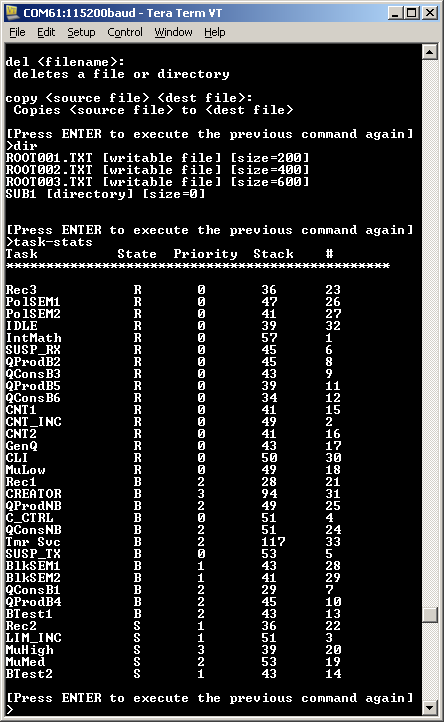
Connect to FreeRTOS-Plus-CLI though the USB to UART bridge USB mini connector using
115200 baud. Type 'help' in the CLI to see a list of the registered commands.
Most of the tasks created by the demo are from the set of standard demo
tasks. These are used by all FreeRTOS demo applications, and
have no specific functionality or purpose other than to demonstrate the FreeRTOS
API being used and test the RTOS kernel port.
The following tasks are created in addition to the standard demo tasks:
-
Register test tasks
These two tasks test the RTOS kernel context switch mechanism by first
filling each Cortex-A9 register (including the floating point registers)
with a known and unique value, then repeatedly checking that the value
originally written to the register is maintained in the register, for
the lifetime of the task. The tasks execute at the lowest possible
priority (the idle priority), so are preempted frequently. The nature of
these tasks necessitates that they are written in assembly.
-
Interrupt nesting test tasks
Two timers are used to test FreeRTOS queues being used from interrupts
that nest to a depth of 3 (including the RTOS tick interrupt). A third
timer is configured to generate a 20KHz interrupt at a
priority above the maximum system call interrupt priority (the maximum
system call interrupt priority is explained on the "Running
FreeRTOS on a Cortex-A9" page) - giving
a total tested interrupt nesting depth of 4.
The high frequency timer is also used as a convenient time source for
the collection of run-time statistics.
The collected statistics can be viewed using the CLI.
-
A 'check' task
The check task periodically queries the standard demo tasks and the
register test tasks to ensure they are functioning as intended. The
check task also toggles an LED to give a visual indication of the system
status.
If the LED toggles every 3 seconds then the check task has not discovered
any problems with the executing demo. If the LED toggles every 200 milliseconds
then the check task has discovered a problem in at least one task..
Functionality with mainSELECTED_APPLICATION set to 2
If mainSELECTED_APPLICATION is set to 2 then main() will call main_lwIP(),
which is implemented in main_lwIP.c.
The lwIP example can be configured to use either a static or dynamic IP
address:
-
To use a dynamically allocated IP address set LWIP_DHCP to 1 in
lwipopts.h and connect the target to a network that includes a DHCP
server. The obtained IP address is printed to the UART console.
-
To use a static IP address set LWIP_DHCP to 0 in lwipopts.h and set
the static IP address using the configIP_ADDR0 to configIP_ADDR3
constants at the bottom of FreeRTOSConfig.h. Constants used to define
a netmask are also located at the bottom of FreeRTOSConfig.h. The
selected IP address and netmask must be compatible with the network to
which the embedded target is to be connected. This can normally be achieved
by setting the first three octects of the target's IP address and netmask
to match the first three octects of the host computer's IP address and
netmask respectively. The chosen IP address must be unique on the network.
A cross over (point to point) Ethernet cable must be used if the target and
host systems are connected directly (without going through a hub or switch).
When connected correctly the demo uses the lwIP sockets API to create
a FreeRTOS-Plus-CLI command console, and the lwIP raw API to create a
basic HTTP web server. Server side includes (SSI) are used to generate dynamic
data in the served web pages.
To connect to the http server simply type the IP address of the target into
the address bar of a web browser.
To connect to FreeRTOS-Plus-CLI, open a command prompt and enter "telnet <ipaddr>"
where <ipaddr> is the IP address of the target. Once connected type "help"
to see a list of registered commands. Note this example does not implement
a real telnet server, it just uses the telnet port number to allow easy
connection using telnet tools.
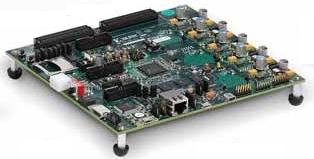
Hardware setup
The demo uses the default hardware configuration.
All of the 5-way boot selection switches must be switched to
the right hand side when the board is viewed with the integrated Digilent JTAG module on the
lower edge. This enables booting via JTAG.
Build Instructions
Importing the demo application project into the SDK Eclipse workspace
To import the Xilinx Software Development Kit (SDK) project into an existing or new Eclipse Workspace:
-
Select "Import" from the SDK "File" menu. The dialogue box shown below
will appear. Select General->Existing Project into Workspace, as shown in the image.
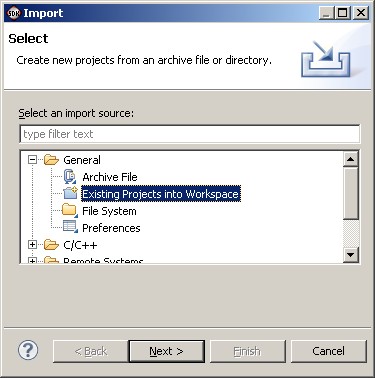 The dialogue box that appears when "Import" is first clicked
-
In the next dialogue box, select FreeRTOS/Demo/CORTEX_A9_Zynq_ZC702
as the root directory. Then, make sure the RTOSDemo, RTOSDemo_bsp and
ZC702_hw_platform projects are checked in the "Projects" area,
and that the Copy Projects Into
Workspace box is not checked, before clicking
the Finish button (see the image below for the correct check box states).
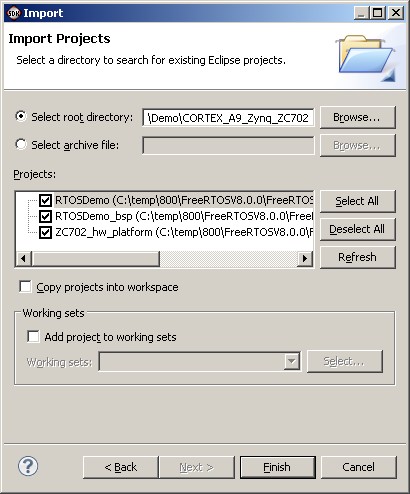 Make sure all three projects are checked, and "Copy projects into workspace" is not checked
-
Once all three projects have been imported, the project explorer window of the SDK IDE
will appear as below.
The ZC702_hw_platform and RTOSDemo_bsp projects are dependencies of the
RTOSDemo project, so only the RTOSDemo project needs to be built explicitly.
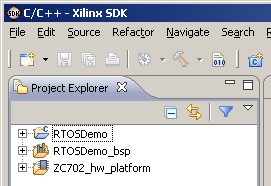 All three projects imported into the workspace
Building the demo application
-
Open the project's main.c file, and set mainSELECTED_APPLICATION
to generate the simple blinky demo, the full test and demo
application, or the lwIP Ethernet example, as required.
-
Select 'Rebuild All' from the IDE 'Project' menu. The application should
build without any errors or warnings.
Note: At the time of writing there is a bug in
the dependency management in the SDK. If a header file is edited then it is necessary
to perform a complete clean and re-build of the entire project for the change to take effect. Failure
to do this will result in seemingly inexplicable run-time behaviour.
Starting a debug session
-
Ensure the ZC702 evaluation board is powered up and connected via its
on-board Digilent JTAG port to the host computer.
-
Select 'Debug Configurations...' from the IDE's 'Run' menu. The
Debug Configurations dialogue box will appear. Double click
'Xilinx C/C++ application (System Debugger)' to create a new debug
configuration.
-
Configure the 'Target Setup' tab as shown in the image below.
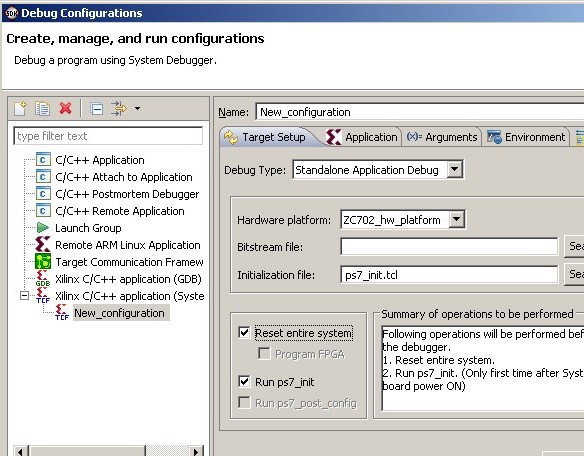 The required settings on the Target Setup tab
-
Configure the 'Application' tab as shown in the image below.
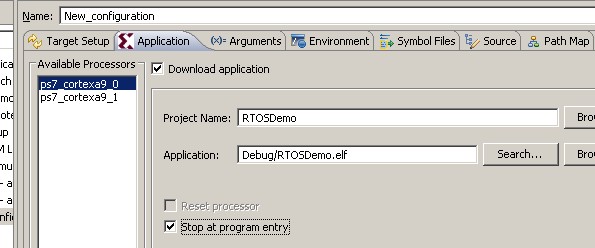 The required settings on the Application tab
All the other tabs in the 'Debug Configurations' dialogue can be left
with their default settings.
-
Click the "Debug" button to commence debugging. The application will be
downloaded to RAM and the debugger will break on entry to main().
FreeRTOS ARM Cortex-A port specific configuration
Attention please!: Refer to the page that provides
instruction on using FreeRTOS on ARM Cortex-A embedded processors,
paying particular attention to the value and meaning of the
configMAX_API_CALL_INTERRUPT_PRIORITY setting, and
the special notes regarding using the floating point unit with GCC.
Configuration items specific to this demo are contained in /FreeRTOS/Demo/CORTEX_A9_Zynq_ZC702/RTOSDemo/src/FreeRTOSConfig.h.
The constants defined in this file can be edited to suit your application.
Interrupt vector table
By default, SDK projects define the interrupt vector table as part of the BSP. This
makes it difficult to install the FreeRTOS handlers using the methods described
on the page about
running FreeRTOS on ARM Cortex-A embedded processors. Therefore this demo
defines its own interrupt vector table in FreeRTOS_asm_vectors.S.
The vector table defined by the BSP is replaced by the vector table defined in
FreeRTOS_asm_vectors.S at run time by calling vPortInstallFreeRTOSVectorTable(),
which in the demo, is done in the prvSetupHardware() function.
The vector table defined in FreeRTOS_asm_vectors.S is placed in a linker
segment called .freertos_vectors, and the linker script lscript.ld places
the .freertos_vectors segment at the beginning of the .text region.
[Application Defined] Interrupt service routines
This demo uses drivers provided by Xilinx to configure the interrupt controller,
and install application defined interrupts. Examples can be found in
FreeRTOS/Demo/CORTEX_A9_Zynq_ZC702/RTOSDemo/src/Full_Demo/serial.c and
FreeRTOS/Demo/CORTEX_A9_Zynq_ZC702/RTOSDemo/src/Full_Demo/IntQueueTimer.c.
The Xilinx drivers require interrupt
service routines (ISRs) to accept a void * parameter, although the parameter
is not always used. The required ISR prototype is therefore:
void Interrupt_Handler( void *pvUnusedParameter );
The interrupt handler called prvUART_Handler() in serial.c
provides an example of an interrupt handler that does not use its parameter. The
interrupt handler called prvTimerHandler() in IntQueueTimer.c
provides an example of an interrupt that uses its parameter to determine which
peripheral generated the interrupt, as in that case the same interrupt handler
implementation is installed as the handler for more than one timer.
If an ISR causes a task of equal or higher priority than the currently executing
task to leave the Blocked state then the ISR must request a context switch before
the ISR exits. When this is done the interrupt will interrupt one RTOS task,
but return to a different RTOS task.
The macros portYIELD_FROM_ISR() (or portEND_SWITCHING_ISR()) can be used to
request a context switch from within an ISR.
The following source code snippet is provided as an example. The example ISR
uses a semaphore to synchronise with a task (not shown), and calls portYIELD_FROM_ISR()
to ensure the interrupt returns directly to the task. The prvUART_Handler() and
prvTimerhandler() functions already referenced provide further examples.
void Dummy_IRQHandler( void *pvUnusedInThisExample )
{
long lHigherPriorityTaskWoken = pdFALSE;

    /* The parameter is not used in this case. */
    ( void ) pvUnusedInThisExample;

    /* Clear the interrupt if necessary. */
    Dummy_ClearITPendingBit();

    /* This interrupt does nothing more than demonstrate how to synchronise a
    task with an interrupt.  A semaphore is used for this purpose.  Note
    lHigherPriorityTaskWoken is initialised to pdFALSE. */
    xSemaphoreGiveFromISR( xTestSemaphore, &lHigherPriorityTaskWoken );

    /* If there was a task that was blocked on the semaphore, and giving the
    semaphore caused the task to unblock, and the unblocked task has a priority
    higher than or equal to the currently Running task (the task that this
    interrupt interrupted), then lHigherPriorityTaskWoken will have been set to
    pdTRUE internally within xSemaphoreGiveFromISR().  Passing pdTRUE into the
    portYIELD_FROM_ISR() macro will result in a context switch being pended to
    ensure this interrupt returns directly to the unblocked, higher priority,
    task.  Passing pdFALSE into portYIELD_FROM_ISR() has no effect. */
    portYIELD_FROM_ISR( lHigherPriorityTaskWoken );
}
Only FreeRTOS API functions that end in "FromISR" can be called from an
interrupt service routine - and then only if the priority of the interrupt
is less than or equal to that set by the configMAX_API_CALL_INTERRUPT_PRIORITY
configuration constant (meaning a numerically higher value).
Resources used by FreeRTOS
Information is provided on the Using FreeRTOS on ARM Cortex-A Embedded Processors page.
This demo is configured to generate the tick interrupt from the SCU timer.
Memory allocation
Source/Portable/MemMang/heap_4.c is included in the ARM Cortex-A demo application project to provide the memory
allocation required by the RTOS kernel.
Please refer to the Memory Management section of the API documentation for
full information.
Miscellaneous
Note that vPortEndScheduler() has not been implemented.
Copyright (C) Amazon Web Services, Inc. or its affiliates. All rights reserved.