ARM Cortex-M33 (ARMv8-M) Demo for NXP LPCXpresso55S69 Development Board
Using MCUXpresso IDE
[RTOS Ports]
This page documents a pre-configured FreeRTOS project that targets the
ARM Cortex-M33 core on the
NXP LPCXpresso55S69 Development Board.
The project uses the MCUXpresso
IDE and GCC compiler to build the FreeRTOS ARMv8-M GCC port. The project demonstrates
using the ARM Cortex-M33 TrustZone and the ARM Cortex-M33 Memory Protection Unit (MPU).
IMPORTANT! Notes on using the FreeRTOS ARM Cortex-M33 port
Please read all the following points before using this RTOS port.
- Source Code Organization
- The Demo Application
- Building and Running the RTOS Demo Application
- RTOS Configuration and Usage Details
Also see the FAQ
My application does not run, what could be wrong?,
the page that
describes running
FreeRTOS on ARMv8-M cores, and the page that describes
setting
ARM Cortex-M interrupt priorities for use with FreeRTOS.
Source Code Organization
The FreeRTOS zip file download contains the source code for all the FreeRTOS ports, and
every demo application. That means it contains many more files than are required
to use the FreeRTOS ARMv8-M Cortex-M33 port. See the
Source Code Organization page for information on the zip file's directory structure.
The project files for this demo are located in the FreeRTOS/Demo/CORTEX_MPU_M33F_NXP_LPC55S69_MCUXpresso/Projects/MCUXpresso
directory. The project file for the secure side of the ARM Cortex-M33 core has the usual
Eclipse project name .project and is located in the FreeRTOS/Demo/CORTEX_MPU_M33F_NXP_LPC55S69_MCUXpresso/Projects/MCUXpresso/Secure
directory. The project file for the non-secure side of the ARM Cortex-M33 core has the usual
Eclipse project name .project and is located in the FreeRTOS/Demo/CORTEX_MPU_M33F_NXP_LPC55S69_MCUXpresso/Projects/MCUXpresso/NonSecure
directory.The FreeRTOS ARMv8-M Cortex-M33 port files compiled in these two projects
are organized as follows:
- Port files compiled in the secure project are in the FreeRTOS/Source/portable/GCC/ARM_CM33/secure directory.
- Port files compiled in the non-secure project are in the FreeRTOS/Source/portable/GCC/ARM_CM33/non_secure directory.
The Demo Application
The project includes two demos:
- TrustZone Demo
- Memory Protection Unit (MPU) Demo
TrustZone Demo
The TrustZone demo demonstrates how to export functions from the secure side
of the ARM Cortex-M33 core, and how to call them from RTOS tasks on the
non-secure side.
- NonSecure Callable Function:
The following function is exported from the secure side and is marked
as non-secure callable:
secureportNON_SECURE_CALLABLE uint32_t NSCFunction( Callback_t pxCallback )
Note the use of secureportNON_SECURE_CALLABLE macro to mark
the function as non-secure callable. This function accepts a callback
as argument. It first invokes the callback function supplied as argument
and then increments a secure side counter. The incremented value of the
secure side counter is returned to the caller.
- NonSecure Callback:
The following function is implemented on the non-secure side and is
passed to the above mentioned non-secure callable function as argument:
void prvCallback( void )
This function increments a non-secure counter.
- Secure Calling Task:
An un-privileged non-secure task is created using the
xTaskCreateRestricted()
API. This task first calls portALLOCATE_SECURE_CONTEXT to allocate
itself a secure context - any non-secure task which wants to call a
function exported from the secure side must allocate itself a secure
context by calling portALLOCATE_SECURE_CONTEXT.
The task then calls the secure side function and passes the non-secure
callback as the argument. The non-secure counter is incremented in the callback
and the secure counter is incremented in the secure function. Therefore,
both the counters must be incremented after the call to the secure function
is complete - this is ensured using configASSERT(). The task
sleeps for one second and then repeats the same.
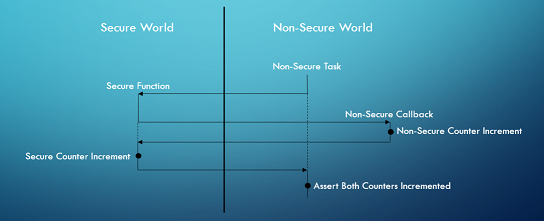 The TrustZone Demo Call Sequence
Memory Protection Unit (MPU) Demo
The MPU demo demonstrates how to use the MPU to grant a task different access permissions
for various memory regions. The MPU demo consists of the following two tasks:
- RW Task:
The RW task has Read-Write access to a shared region of memory (namely
ucSharedMemory).
- RO Task:
The RO task has Read-Only access to the same shared region of memory
(namely ucSharedMemory). This task tries to write to the
shared memory and since it has read only permission to the shared memory,
it results in a memory fault. The fault handler checks if it is the
expected fault from the RO task and if so, it recovers gracefully by
incrementing the Program Counter to the next statement.
Building and Running the RTOS Demo Application
-
Launch the MCUXpresso IDE. Note that you need the MCUXpresso IDE
version 10.3.1 or higher to be able to build and run this demo.
-
Choose the workspace directory and click "Launch".
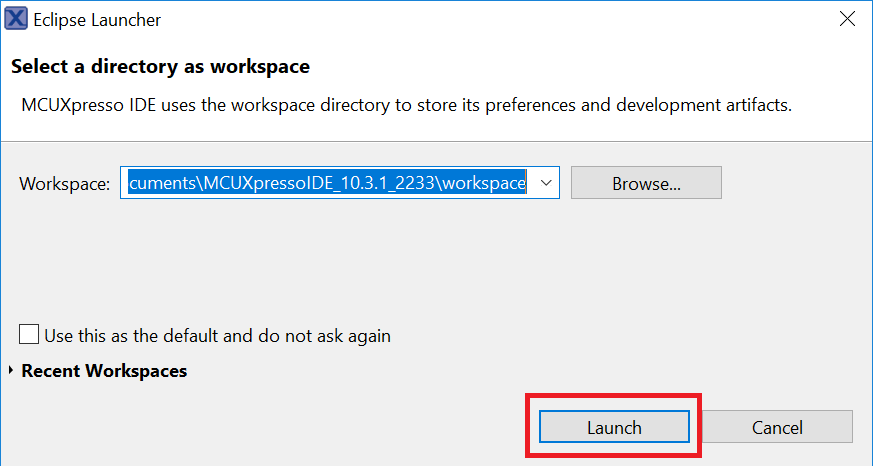 MCUXpresso IDE - Launcher. Click to enlarge.
-
Open the Import Project dialog by clicking "File --> Import...".
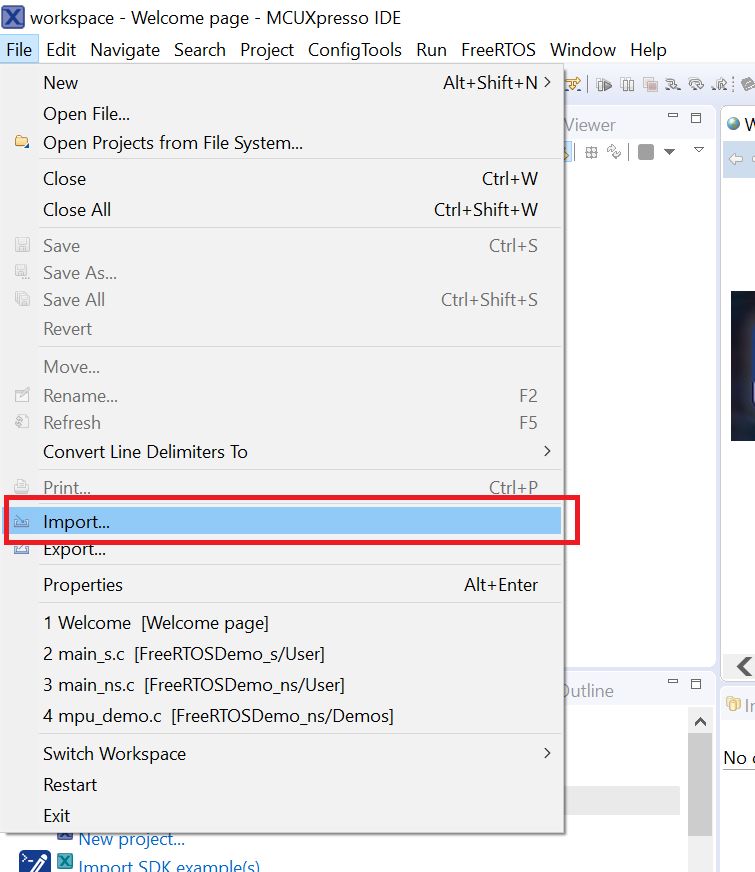 MCUXpresso IDE - Import. Click to enlarge.
-
Select "General --> Existing Projects into Workspace" and click "Next".
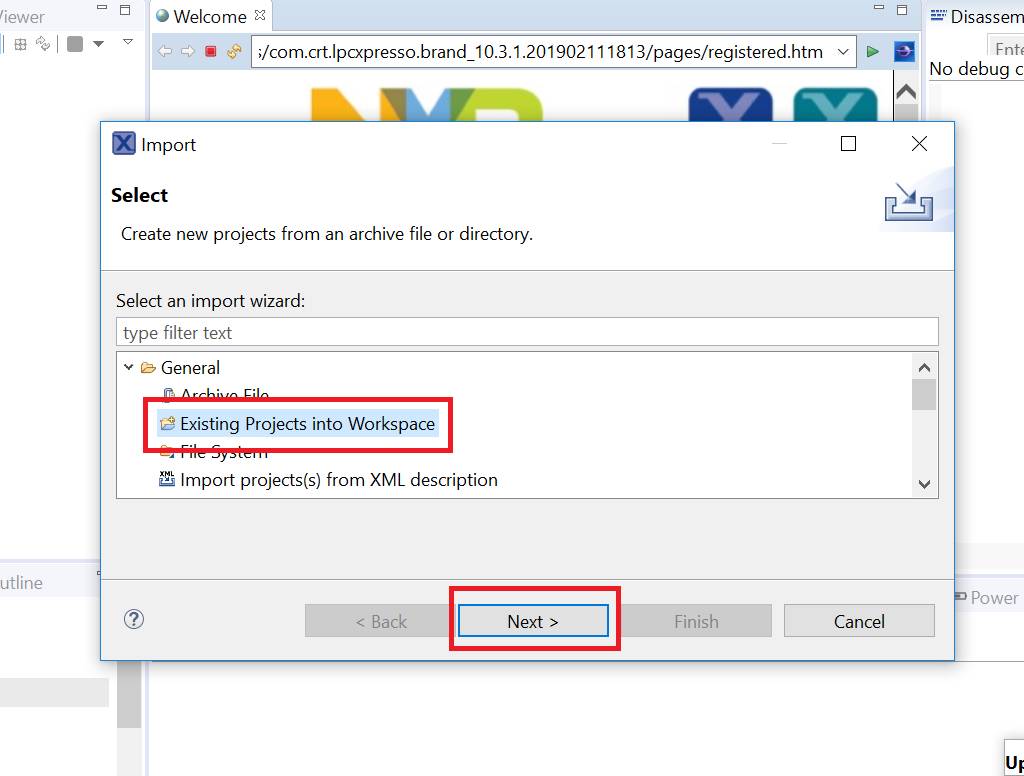 MCUXpresso IDE - Import. Click to enlarge.
-
Click "Browse..." next to "Select root directory" and select
FreeRTOS/Demo/CORTEX_MPU_M33F_NXP_LPC55S69_MCUXpresso/Projects/MCUXpresso directory.
Two projects, namely FreeRTOSDemo_s and FreeRTOSDemo_ns, should be visible
in the Projects pane as shown below. Click "Finish".
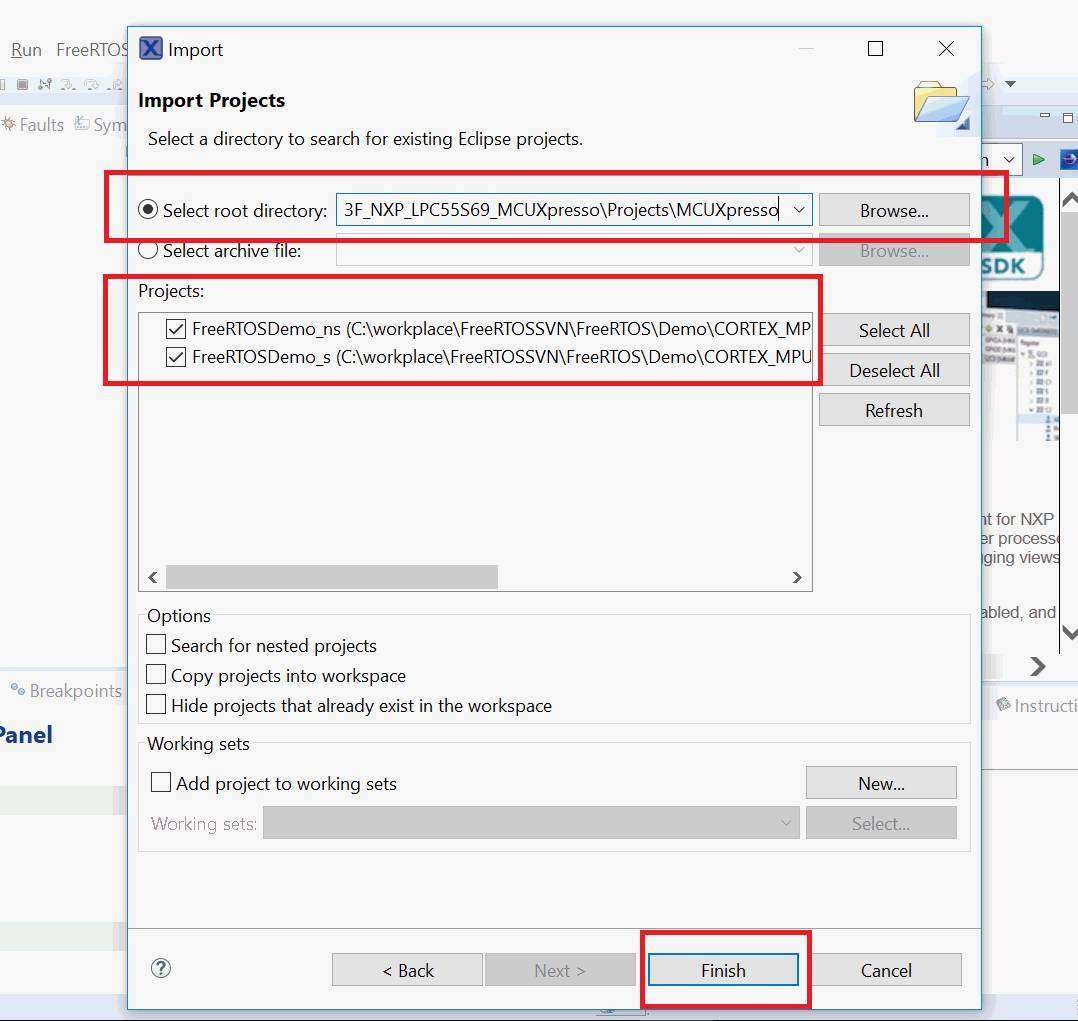 MCUXpresso IDE - Import. Click to enlarge.
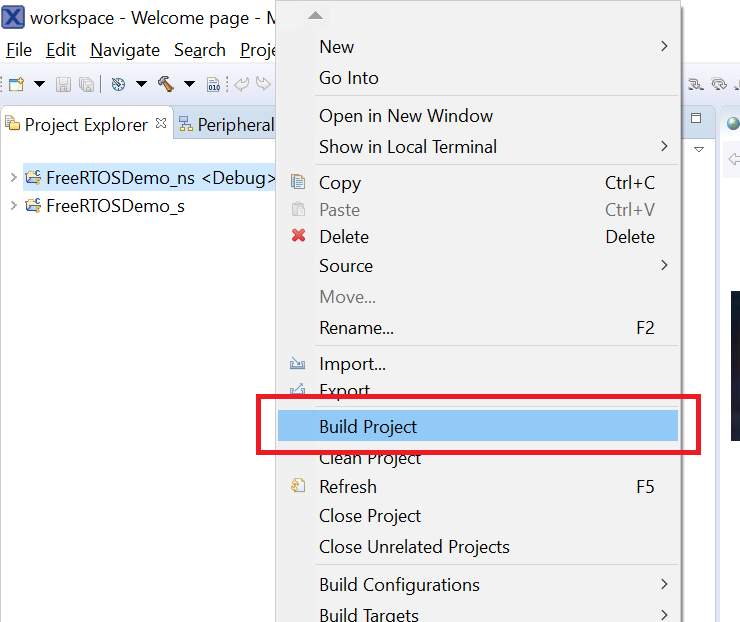
-
Build the secure project by right clicking on FreeRTOSDemo_s and selecting
"Build Project".
 MCUXpresso IDE - Build Secure Project. Click to enlarge.
-
Build the non-secure project by right clicking on FreeRTOSDemo_ns and selecting
"Build Project".
 MCUXpresso IDE - Build Non-Secure Project. Click to enlarge.
-
Power up the board using "Debug Link (P6)" micro USB port.
-
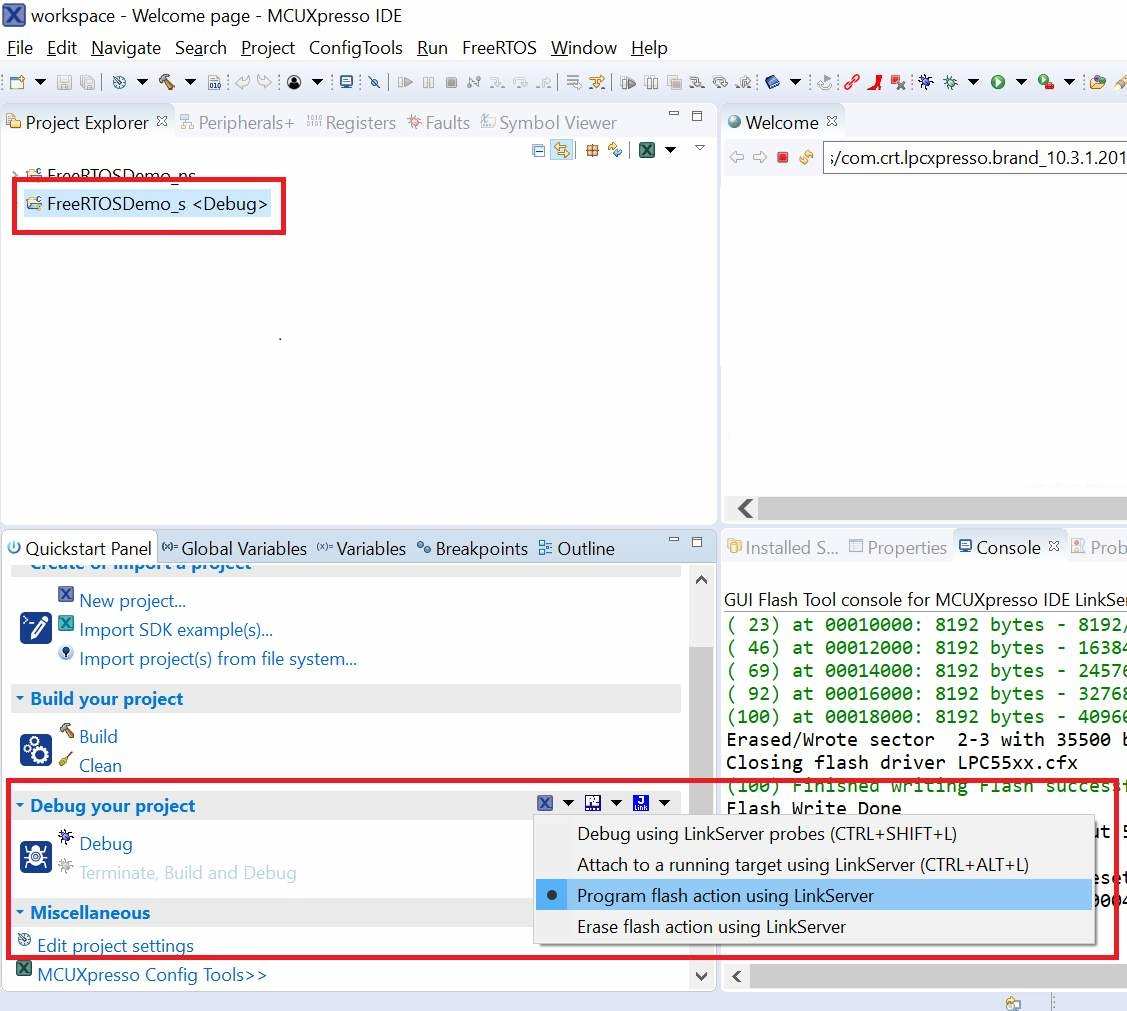
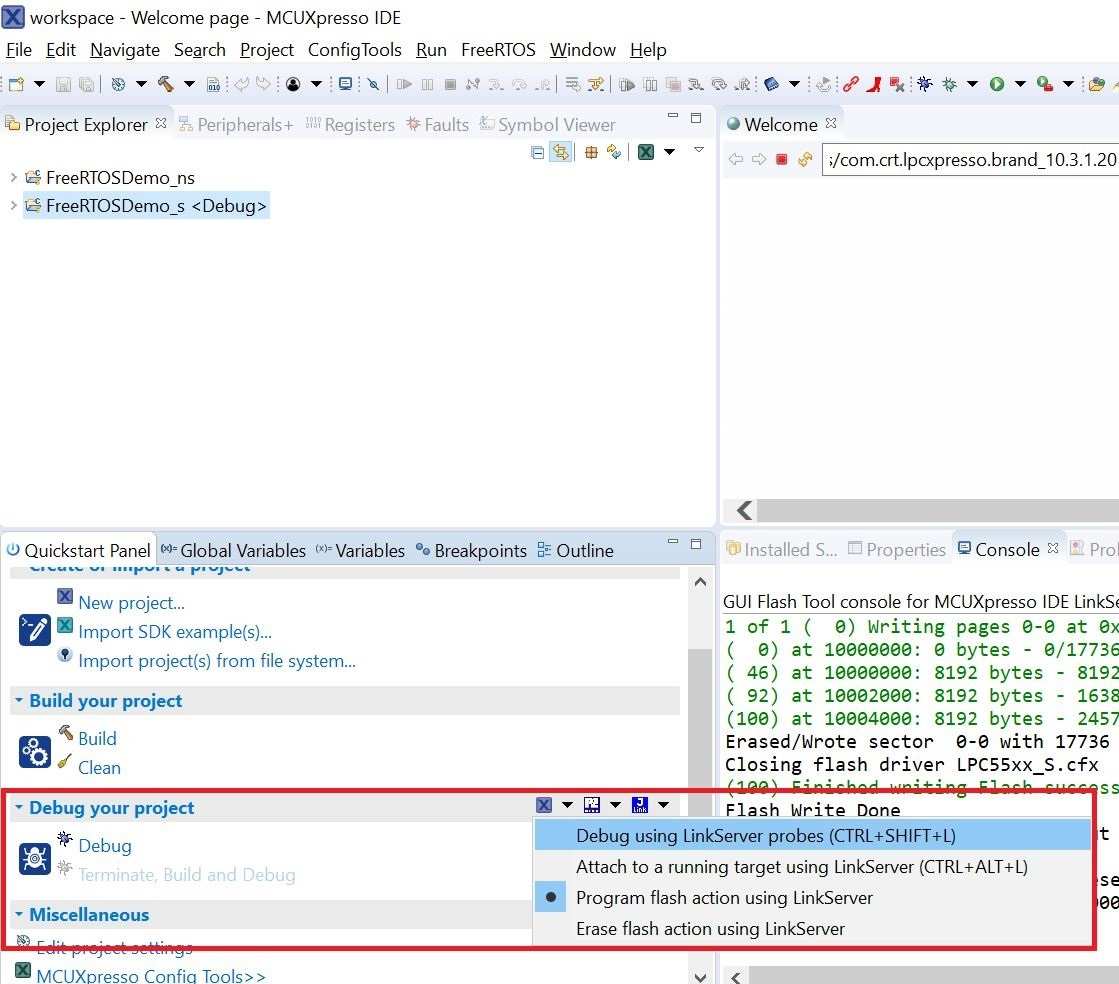
Select the non-secure project by clicking FreeRTOSDemo_ns. Go to
"Debug your project" in the Quickstart Panel and click on
"Program flash action using LinkServer" in the dropdown as shown below.
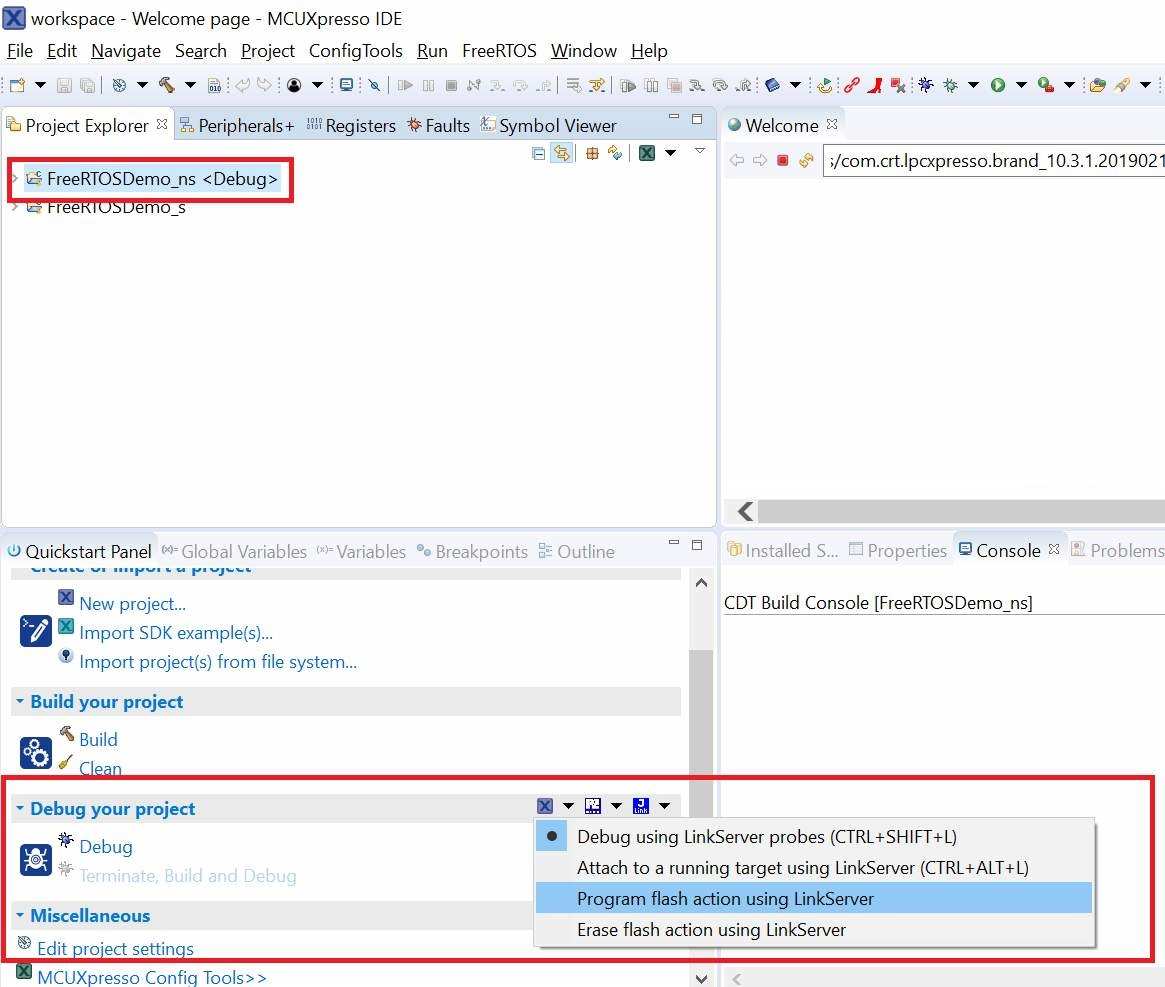 MCUXpresso IDE - Flash the Non-Secure Binary. Click to enlarge.
-
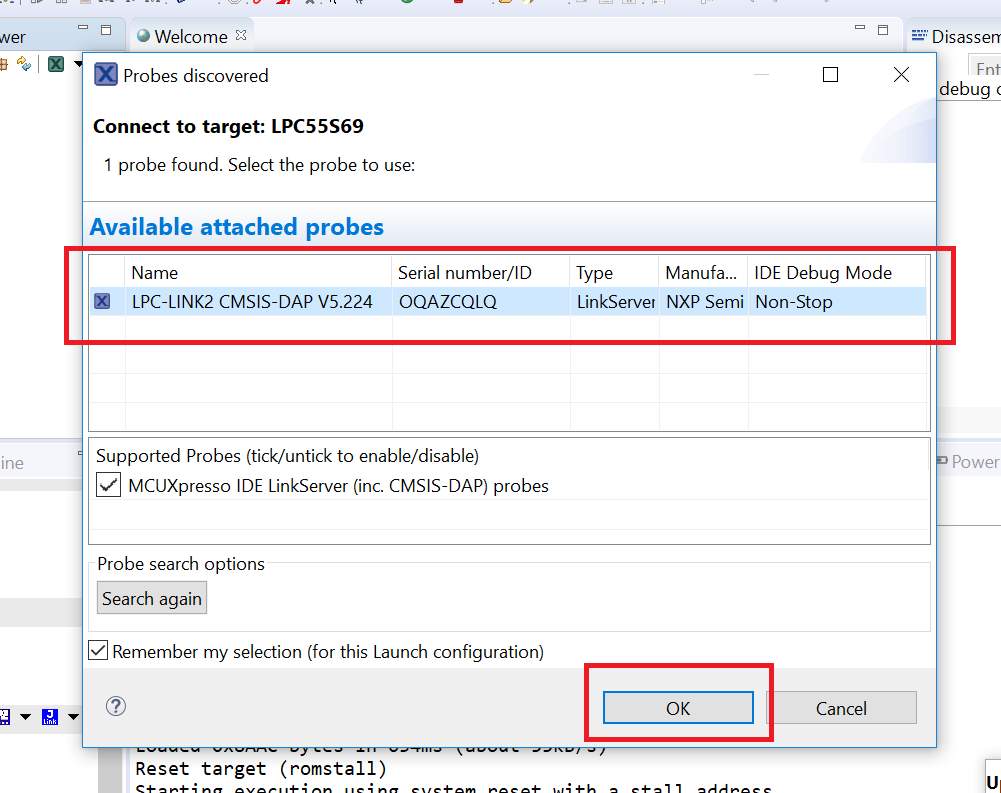
LPC-LINK2 probe should be shown in the "Probes Discovered" window. Click "OK".
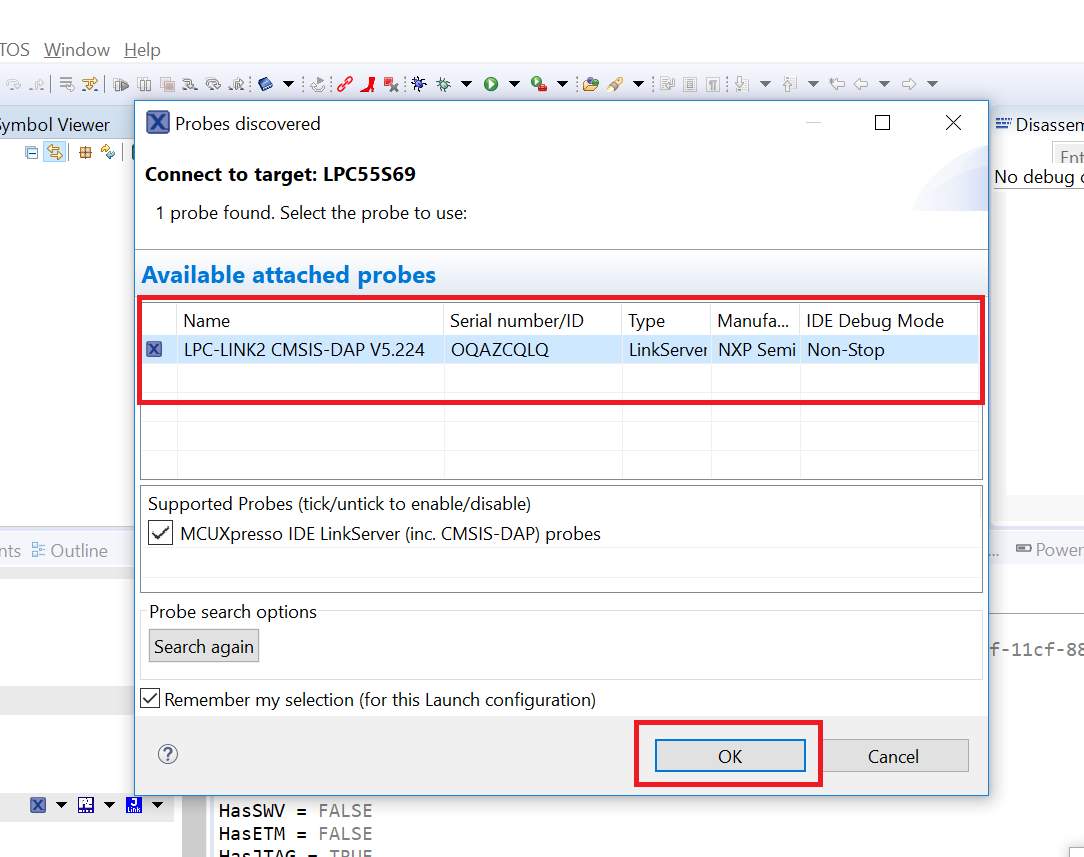 MCUXpresso IDE - Flash the Non-Secure Binary. Click to enlarge.
-
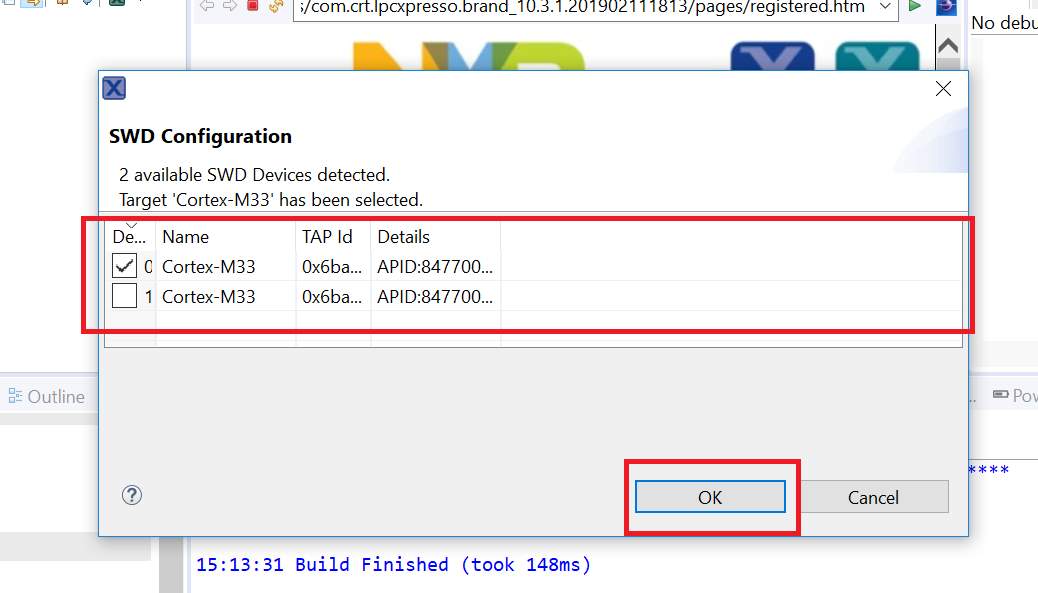
SWD Device 0 should be selected in the "SWD Configuration" window. Click "OK".
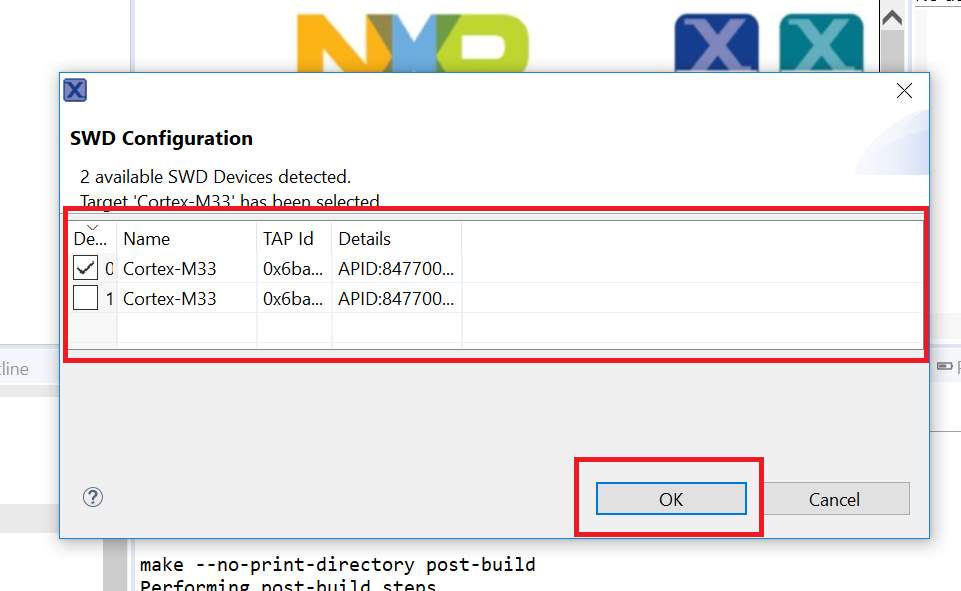 MCUXpresso IDE - Flash the Non-Secure Binary. Click to enlarge.
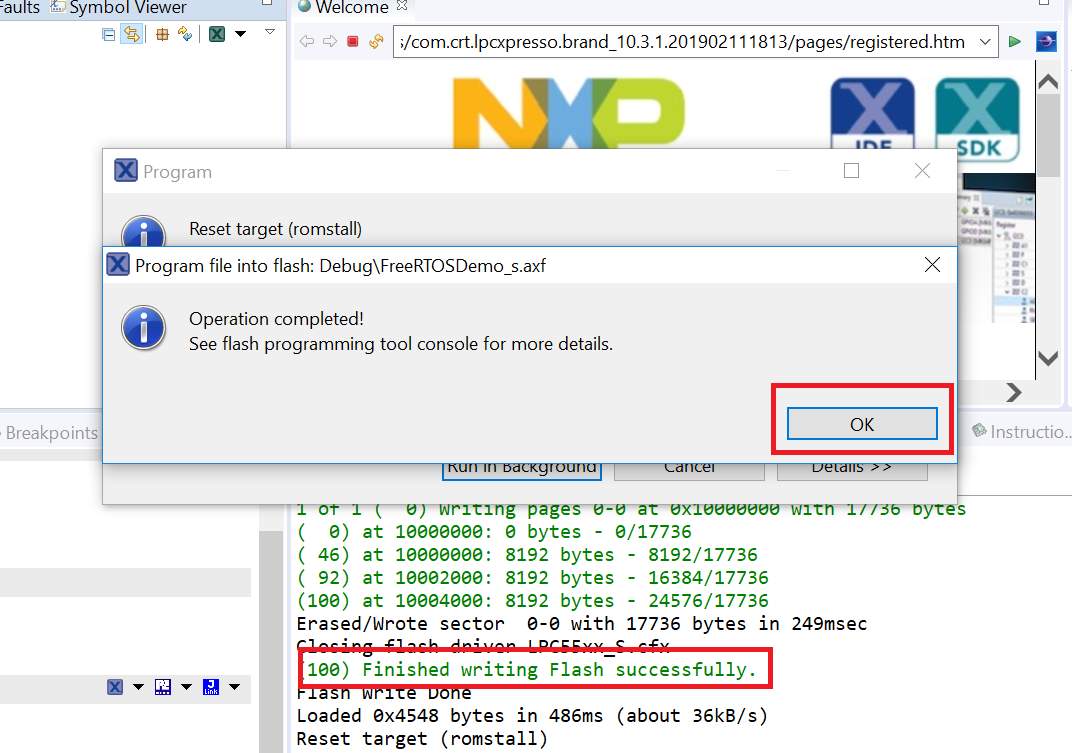
-
You should see "Finished writing Flash successfully" in the logs.
Click "OK".
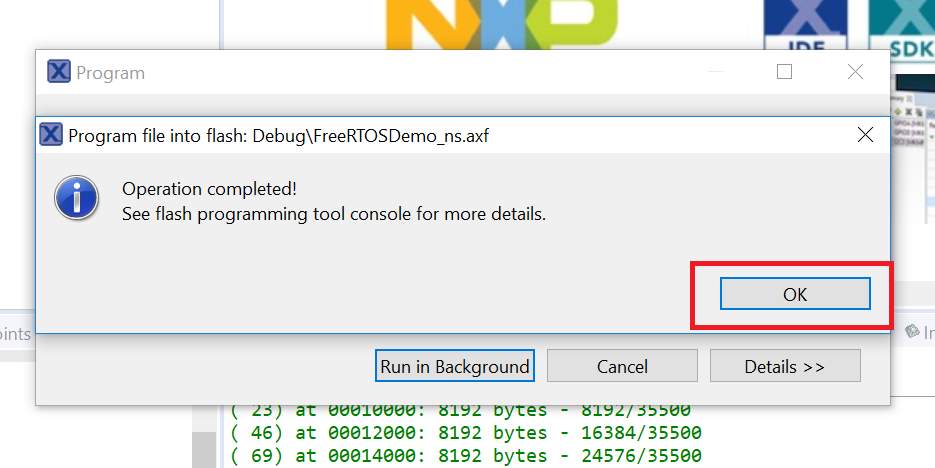 MCUXpresso IDE - Flash the Non-Secure Binary. Click to enlarge.
-
Power cycle the board by disconnecting and reconnecting the micro USB cable.
-
Select the secure project by clicking FreeRTOSDemo_s. Go to
"Debug your project" in the Quickstart Panel and click on
"Program flash action using LinkServer" in the dropdown as shown below.
 MCUXpresso IDE - Flash the Secure Binary. Click to enlarge.
-
LPC-LINK2 probe should be shown in the "Probes Discovered" window. Click "OK".
 MCUXpresso IDE - Flash the Secure Binary. Click to enlarge.
-
SWD Device 0 should be selected in the "SWD Configuration" window. Click "OK".
 MCUXpresso IDE - Flash the Secure Binary. Click to enlarge.
-
You should see "Finished writing Flash successfully" in the logs.
Click "OK".
 MCUXpresso IDE - Flash the Secure Binary. Click to enlarge.
-
Power cycle the board by disconnecting and reconnecting the micro USB cable.
-
Go to "Debug your project" in the Quickstart Panel and click
"Debug using LinkServer probes" in the dropdown as shown below to
start the debug session.
 MCUXpresso IDE - Start the Debug Session. Click to enlarge.
Also see the page that
describes running
FreeRTOS on ARMv8-M cores, and the page that describes
setting
ARM Cortex-M interrupt priorities for use with FreeRTOS.
-
Configuration items specific to this demo are contained in FreeRTOS/Demo/CORTEX_MPU_M33F_NXP_LPC55S69_MCUXpresso/Projects/MCUXpresso/Config/FreeRTOSConfig.h.
The constants defined in that file can be edited
to suit your application. The following configuration options are
specific to the ARM Cortex-M33 port:
- configENABLE_MPU - Enable/Disable Memory Protection Unit (MPU).
- configENABLE_FPU - Enable/Disable Floating Point Unit (FPU).
- configENABLE_TRUSTZONE - Enable/Disable TrustZone.
-
If you want to run FreeRTOS with TrustZone disabled, set configENABLE_TRUSTZONE
to 0 in your FreeRTOSConfig.h and use the FreeRTOS port files
in the FreeRTOS/Source/portable/GCC/ARM_CM33_NTZ directory.
-
If you want to run FreeRTOS on the secure side, set configENABLE_TRUSTZONE
to 0 and configRUN_FREERTOS_SECURE_ONLY to 1 in your FreeRTOSConfig.h
and use the FreeRTOS port files in the FreeRTOS/Source/portable/GCC/ARM_CM33_NTZ
directory.
-
Source/Portable/MemMang/heap_4.c is included in the project
to provide the memory allocation required by the RTOS kernel. Please
refer to the Memory Management section of
the API documentation for full information.
-
vPortEndScheduler() has not been implemented.
Copyright (C) Amazon Web Services, Inc. or its affiliates. All rights reserved.